Introduction to the functions of YK-Z temperature controller
The specific functions are as follows:
1. The YK-Z thermostat adopts PIDD or PID control mode. Both modes are optional. PIDD is an internationally leading temperature control technology, which not only enables precise temperature control but also extends the service life of the heater by 30%.
2. Temperature units can be adjusted between ℃ and ℉;
3. The temperature sensing wire (thermocouple) model, either J-type or K-type, is adjustable.
4. Preheating and dehumidification function: When the temperature of the hot runner is below 105℃, preheating and dehumidification can prevent damage to the heater due to mold moisture regain, thereby extending the service life of the heater. When the temperature of all points in the hot runner is above 105℃, the thermostat will automatically cancel the preheating and dehumidification function. If some points are above 105℃ and some are below 105℃, the higher points will stop heating, while the lower points will heat up to 105℃ and maintain this temperature for more than the preheating and dehumidification time before continuing to heat up. Users can set the preheating and dehumidification time according to the mold usage condition or the humidity level of the air, which is generally set to 3 minutes. If the mold is dry, to speed up the heating process, set it to 0 minutes, which cancels the preheating and dehumidification function. (Please refer to page 5 for detailed instructions). If set to 3 minutes and the temperature of the hot runner is below 105℃, after startup, all temperature control points will output at a ratio of 30%, with the nozzle heating up quickly and the manifold heating up slowly. When the nozzle reaches 105℃, it will maintain at 105℃ and wait for the manifold to heat up. Once the manifold reaches 105℃, it will uniformly maintain at 105℃ for 3 minutes before continuing to heat up,
5. Synchronized temperature rise function: This function can prevent losses caused by raw material decomposition, carbonization, and modification during the waiting time for the manifold to heat up due to rapid temperature rise of the nozzle. The temperature rise characteristic of this function is that when the temperature reaches the set temperature (i.e., 50°C below the set temperature), the high-temperature point maintains this temperature and waits for the low-temperature point to heat up. Once the low-temperature point reaches this temperature and remains for 1-5 minutes, the P, I, D parameters are set, and then the temperature continues to rise and stabilizes at the set temperature ±1°C. However, sometimes due to aging of the thermocouple at a certain point or insufficient heater power, as well as other situations, the set temperature at that point may be unstable. In this case, the temperature controller cannot set appropriate P, I, D parameters, and other heating points will maintain the set temperature without heating up. At this time, you can restart the stabilizer or locate the temperature point with unstable set temperature on the display screen, and manually set its P, I, D parameters. For specific operations, please refer to the parameter setting instructions. For example, if the set temperature is 230°C and the set temperature is 170°C
6. Fault alarm and temperature rise stopping function, which means that when the temperature controller or hot runner system malfunctions, all points will stop heating to prevent burning the raw materials and heaters.
7. Temperature rise to set temperature prompt: When the temperature reaches the set temperature, the thermostat will alarm to prompt the operator to proceed with production (the display screen will show "TEMP-UP….OK"). This is to avoid burning the raw materials due to prolonged production downtime under high temperature conditions.
The main features of the YK-Z thermostat are as follows:
1. Integration: Temperature control and time control are integrated together, featuring a compact size and multiple control points. The temperature can be controlled up to 128 temperature control points, and the time controller can manage up to 12 groups.
2. Unique design, beautiful and practical: The color screen display is as good as a small laptop, which can be opened or closed to avoid collision damage.
3. Easy and quick to use: The temperature can be set all at once or in stages, and the temperature units or sensor wire models can also be set all at once. It can store 10 sets of mold hot runner parameters for convenient use in future production.
4. Convenient maintenance: The temperature control card can be easily plugged in and out; all connections between the display, temperature controller, and other control boards are made with connectors, facilitating maintenance. In case of a fault in the temperature control box, there is no need to send the entire box back to the manufacturer. Simply send the temperature control card, display, or other control board.
5. High intelligence: Accurate temperature measurement, stable temperature control, synchronous temperature rise function, alarm reminder when reaching the set temperature, to avoid burning raw materials.
6. When there is a lack of zero line or live line, or when the zero line and live line are connected incorrectly in a three-phase four-wire power supply, a dedicated protection device is installed to automatically protect and prevent any damage to any components.
7. It features multiple alarm protection functions, excellent stability, low failure rate, and a long service life.
Monitor instructions
Screen during work
#NO序号 | NAME温控点序号 | SET_T 设定温度 | RUN_T 实际温度 | OUT输出比例 | TYPE热电偶型号 | |
1 | #001 | 200 ℃ | 200 ℃ | 0% | IC(J型) | |
2 | #002 | 200 ℃ | 200 ℃ | 0% | IC(J型) | |
3 | #003 | 200 ℃ | 200 ℃ | 0% | IC(J型) | |
4 | #004 | 200 ℃ | 200 ℃ | 0% | IC(J型) | |
5 | #005 | 200 ℃ | 200 ℃ | 0% | IC(J型) | |
6 | #006 | 200 ℃ | 200 ℃ | 0% | IC(J型) | |
7 | #007 | 200 ℃ | 200 ℃ | 0% | IC(J型) | |
8 | #008 | 200 ℃ | 200 ℃ | 0% | IC(J型) | |
技术参数说明
项目 | 参数 |
电源电压 | 380VAC |
电源频率 | 50—60HZ |
工作温度 | -20—60℃ |
存储温度 | -30—70℃ |
保险管规格 | 15A,6×30mm |
热电偶 | J、K型可调 |
设温范围 | 0—499℃ |
取样速度 | 0.1s |
测温精度 | 0.5℃ |
控温精度 | ±1℃ |
控制模式 | PID |
输出功率 | 0—3.6KW |
超高温报警上限 | 30℃ |
超底温报警下限 | 30℃ |
按键说明
ESC键:返回键
MENU键:功能键,按此键将弹出输入密码进入菜单画面。
TEXT键:文字输入时须按住此键
CLR键:清除键
ENT键:确认键
 上下左右键:可上下左右移动光标。
数字键:可输入数字和字母。
使用说明
一:电源线的安装和特征
R(火线) | S(火线) | T(火线) | N(零线) | E(地线) | |
颜色 | 红色 | 红色 | 红色 | 黑色 | 黄绿双色 |
注意:当电源电压为AC380V时,黑色必须接到零线上,否则无法启动。
当电源电压为200V时,黑色线无须接到零线上。
二:温控参数设定说明:
![]() 进入菜单选择画面 按MENU键1次,显示如下
进入菜单选择画面 按MENU键1次,显示如下![]()
![]()
→输入密码000000(初使密码为6个0)→按ENT键1次,显示如下
| CHANNEL EDIT 【#NO】温度设定(单组设定)
TEMP SET(ALL ZONE) 温度设定(全部设定)
TEMP UNIT SELECT 温度单位选择
SENSOR TYPE(ALL ZONE)感温线型号选择(全部设定)
ICON POSITION MOVE
PRE HEATTING TIME SET预热时间设定(一般设定为0-3分钟)
SOL VALVE PROGRAM射胶阀设定(时间控制器设定)
TUNNING PID DATA PID数据(可手动设定P、I、D参数)
ALARM LIST CLEAR
CHANGE TOOL PAGE保存模具名称和参数页面
DOWNLOAD IMAGE【PC】
COPY PAGE
PRE HEATTING TIME SET SOL VAVE PROGRAM ALARM LIST CLEAR
|
1、单段温度设定
进入菜单选择画面,光标移至CHANNEL EDIT→按ENT键1次,显示如下
#NO | SET-T | NAME | TYPE | SADR | CAL | S/W | RUN-T |
1 | 200 ℃ | #001 | IC(J型) | 1 | 00 | ON | 200 ℃ |
2 | 200 ℃ | #002 | IC(J型) | 2 | 00 | ON | 200 ℃ |
3 | 200 ℃ | #003 | IC(J型) | 3 | 00 | ON | 200 ℃ |
4 | 200 ℃ | #004 | IC(J型) | 4 | 00 | ON | 200 ℃ |
5 | 200 ℃ | #005 | IC(J型) | 5 | 00 | ON | 200 ℃ |
6 | 200 ℃ | #006 | IC(J型) | 6 | 00 | ON | 200 ℃ |
7 | 200 ℃ | #007 | IC(J型) | 7 | 00 | ON | 200 ℃ |
8 | 200 ℃ | #008 | IC(J型) | 8 | 00 | ON | 200 ℃ |
将光标移至“SET-T”栏下方,输入温度参数→按ENT键1次确认→当温度设定完毕后按ESC键2次将返回到加热状态显示画面
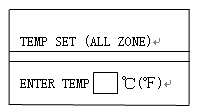
2、全段温度设定:
进入菜单选择画面,光标移至TEMP SET→按ENT键1次→进入温度设定画面
![]()
方框内输入温度参数→按ENT键1次→按ESC键2次将返回到加热状态显示画面
3、温度单位设定:
进入菜单选择画面,将光标移至TEMP UNIT SELECT→按ENT键1次→进入温度单位设定画面,
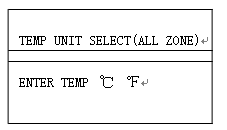
按左右键选择℃或℉→按ENT键1次→按ESC键2次将返回到加热状态显示画面
4、感温线(热电偶)型号设定:
进入菜单选择画面,光标移至SENSOR TYPE→按ENT键1次→进入温度设定画面,
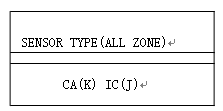
按左右键选择J(IC)型或K(CA)型→按ENT键1次→按ESC键2次将返回到加热状态显示画面
5、预热潮湿时间设定
进入菜单选择画面,光标移至PRE-HEATTING→按ENT键1次→进入预热时间设定画面
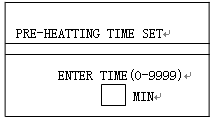
输入时间参数(一般设定为0-3分钟)→按ENT键1次→按ESC键2次将返回到加热状态显示画面
此功能是为了延长加热的寿命,在热流道系统温度低于105℃时其电流为正常加热的30%。即在设定时间内其温度将升到105℃并保持不变。时间单位是分钟,出厂设定为3分钟,以下为推荐时间参数表:
空气湿度 | 设置时间(分钟) | M m | 推荐设置时间(分钟) |
低于50% | 1-3 | 春季 | 1——3 |
50——60% | 3——5 | 夏季 | 8——10 |
60——80% | 8——10 | 秋季 | 3——5 |
超过80% | 10——15 | 冬季 | 1——3 |
雨季 | 同上一页 | 雨季·阴天 | 10——15 |
6、温控器PID参数手动调整
YK-Z温控器将自动检测温度控制参数P、I、D值,如果有的温度段出现温度难以控制,一直有偏差,或整定温度不稳定,导致实际温度与设定温度一直相差50℃,此时可手动调整P、I、D值,达到所需的控制效果。调整前先查看同类加热点(同是射咀或同是分流板)的P、I、D值,然后对照调整不稳定点的P、I、D值。步骤如下:
进入菜单选择画面,将光标移至TUNNING PID DATA→按ENT键1次→显示如下
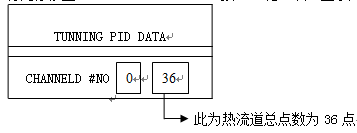
输入正常温度段(点)序号,比如第6点→按ENT键1次,显示如下:
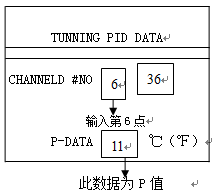
![]()
P对应框内的数值就是自镇定的P值,可输入参数设定→按ENT键1次,显示如下:
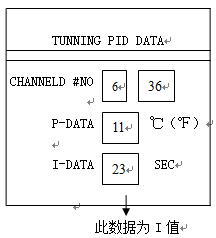
I对应框内的数值就是I值,可输入参数设定→按ENT键1次,显示如下:
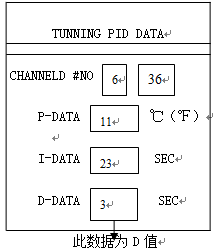
D对应框内的数值就是D值,可输入参数设定,记录完P、I、D值后→按ENT键2次→按上述方法输入不正常温度点的序号,然后更改其P、I、D值,设定完后按ENT键1次→按ESC键退出
以喷嘴为例:先找出温度稳定射咀的PID值,然后再设定不稳定射咀的PID值
以分流板为例:先找出分流板温度稳定点的PID值,然后再设定不稳定点的PID值
7、模具名称和参数存储及复制
1、名称和参数存储
存储模具名称和技术参数,模具名由字母和数字组成
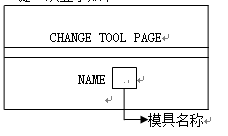
当模具参数设定好且生产正常后,方可存储模具名称和技术参数。进入菜单选择画面,将光标移至CHANGE TOOL PAGE→按ENT键1次,显示如下:
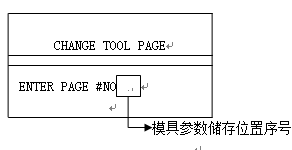
输入序号(即该模具名称想存储在第几位,如果想放在第一位则输入1,第二则输入2,以此类推)→按ENT键1次,显示如下:
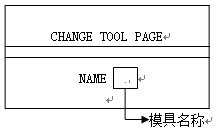
输入模具名称(模具名字母输入方法:按住TEXT键不放,然后按字母所在键,字母排在该键第1位则按1次,排在第2位则按2次,以此类推,按好后放开TEXT键,所需字母将显示出来。例:字母C的输入,按住TEXT键不放,然后按8键3次,放开TEXT键,字母C将显示出来。)→按ENT键1次→按ESC键2次将返回到加热状态显示画面
注意:模具名称和储存序号必须对应牢记
2、参数复制
开机后,进入菜单选择画面,将光标移至CHANGE TOOL PAGE→按ENT键1次,显示如下:
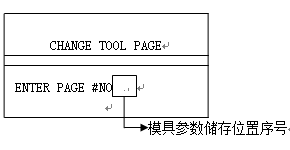
输入序号(即该模具名称存储在第几位,如果是第一位则输入1,第二则输入2,以此类推,不能有误)→按EXT键1次显示如下:
NAME(名称)框内将显示模具名称,如果序号和名称是对应的就按ENT键1次,系统将转换为开机状态,自动复制该模具热流道温控器和时间控制器参数。
8、密码取消和更改
1、密码取消
在使用过程中根据需要可取消密码功能,避免每次更改参数时都要输入密码的麻烦。但关掉电源再次开机又会自动出现密码功能。取消密码步骤:
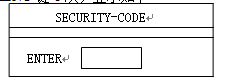
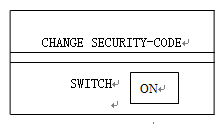
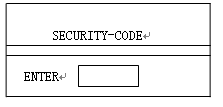
进入菜单选择画面,将光标移至CHANGE SECURITY-CODE→按ENT键显示如下:
![]()
按 任意一个键可选择为OFF或ON,选择OFF则取消密码功能,按ENT键确认,退出到正常工作画面,按MENU键可直接进入菜单选择画面
2、密码更改
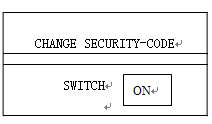
进入菜单选择画面,将光标移至CHANGE SECURITY-CODE→按ENT键1次显示如下:
![]()
再按EXT键1次,显示如下
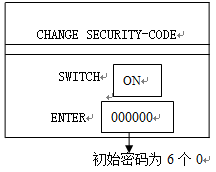
输入所设密码→按ENT键1次确认,按ESC键2次将返回到加热状态显示画面。切记所更改的密码,如果忘记更改后密码请与本公司联系,将协助解开密码。
3、密码恢复:如果忘记了密码,请按下TEXT按钮并输入HOTSYS,这样该密码将
会被解锁,恢复到初始密码000000.
三、温控段(点)关闭说明
1、关闭正常温控点
进入菜单选择画面,光标移至CHANGE EDIT[#NO],按ENT键1次,显示如下:
#NO | SET-T | NAME | TYPE | SADR | CAL | S/W | RUN-T |
1 | 200 ℃ | #001 | IC(J型) | 1 | 00 | ON | 200 ℃ |
2 | 200 ℃ | #002 | IC(J型) | 2 | 00 | ON | 200 ℃ |
3 | 200 ℃ | #003 | IC(J型) | 3 | 00 | ON | 200 ℃ |
4 | 200 ℃ | #004 | IC(J型) | 4 | 00 | ON | 200 ℃ |
5 | 200 ℃ | #005 | IC(J型) | 5 | 00 | ON | 200 ℃ |
6 | 200 ℃ | #006 | IC(J型) | 6 | 00 | ON | 200 ℃ |
7 | 200 ℃ | #007 | IC(J型) | 7 | 00 | ON | 200 ℃ |
8 | 200 ℃ | #008 | IC(J型) | 8 | 00 | ON | 200 ℃ |
将光标移至需要关闭或开启点的 “ON”或“OFF”位置。按“1”为开启,显示为“ON”,再按ENT键确认;按“0”为关闭,显示为“OFF”再按ENT键确认。设定好后按ESC键2次返回到加热状态参数表。
2、关闭报警温控点或空闲没使用温控点
温控器为64段(点)以下(含64段),如果有部分温控段(点)不使用,开机后将自动关闭不使用温控点,不会报警。
温控器为65段(点)以上(含65段),如果有部分温控段(点)不使用,则需要手动关闭空闲温控点,否则开机后将报警显示为SENSOR OPEN ERROR #NO(温控段序号),此时需重新启动温控器。当温控器启动显示器显示如下时:
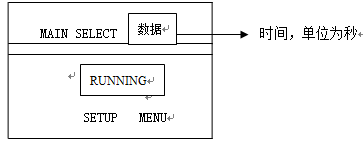
按↓键,光标移至“SETUP MENU”,再按ENT键,显示如下
输入密码,按ENT键,进入菜单选择画面,光标移至CHANGE EDIT[#NO],按ENT键1次,显示如下:
#NO | SET-T | NAME | TYPE | SADR | CAL | S/W | RUN-T |
1 | 200 ℃ | #001 | IC(J型) | 1 | 00 | ON | -- ℃ |
2 | 200 ℃ | #002 | IC(J型) | 2 | 00 | ON | -- ℃ |
3 | 200 ℃ | #003 | IC(J型) | 3 | 00 | ON | -- ℃ |
4 | 200 ℃ | #004 | IC(J型) | 4 | 00 | ON | -- ℃ |
5 | 200 ℃ | #005 | IC(J型) | 5 | 00 | ON | -- ℃ |
6 | 200 ℃ | #006 | IC(J型) | 6 | 00 | ON | -- ℃ |
7 | 200 ℃ | #007 | IC(J型) | 7 | 00 | ON | -- ℃ |
8 | 200 ℃ | #008 | IC(J型) | 8 | 00 | ON | -- ℃ |
将光标移至需要关闭或开启点的 “ON”或“OFF”位置。按“1”为开启,显示为“ON”,再按ENT键确认;按“0”为关闭,显示为“OFF”再按ENT键确认。设定好后按ESC键2次返回到加热状态参数表。
五、时间控制器参数设定说明
进入菜单选择画面,将光标移至SOL VALVE PROGRAM→按ENT键,显示如下
SOL1 | IN1 0.00SES | 0.00SES | TEST |
↓ ↓ ↓ ↓ ↓
第一组 半自动控制 延迟开启时间 开启时间 手动控制
输入时间参数→按ENT键确认
时间控制有全自动控制、半自动控制、手动控制
全自动控制:设定好各段时间后,退出该画面,即为全自动状态
半自动控制:设定好各段时间后,光标移致“IN1”,按数字“1”,所有点将按所设定的时间工作,按“0”则停止工作。
手动控制:单点手动控制,光标移致该点的“TEST”,按“1”开启,按“0”关闭,
所有点手动控制,光标移致任意点的“TEST”,按“4”开启,按“0”关闭
八:故障现象及解决方法
(一)开机故障现象及原因
1、开机后指示灯不亮,显示器不启动:缺零线或火线(相线)或启动控制板坏。
解决方法:检查总电源是否缺零线或火线,如果电源正常则拆开机箱后盖查看机箱电源开关是否缺相,如果开关正常则查看5伏电源板L,N接线端子是否有220伏电源输入和-V,+V接线端子是否有5伏电输出,如果有220伏电源输入而无5伏电输出说明电源板损坏(查看电源板保险丝或寄给本公司维修);如果无220伏电源输入说明启动控制板损坏,拆开装有蜂鸣器和指示灯的盖板,即看见启动控制板,查看保险丝,规格2A,如果保险丝没坏,则说明控制板电子元件损坏,请拆下控制板寄给本公司维修。
2、开机后红色指示灯亮起,显示器不启动:启动控制板损坏或显示器驱动板损坏。
解决方法:拆开装有蜂鸣器和指示灯的盖板,即看见启动控制板,查看保险丝,规格2A,如果保险丝没坏,则更换一块使用正常的控制板,开机如果正常说明所拆下的控制板已损坏,请寄给本公司维修;如果开机依然红色指示灯亮起,请将启动控制板和显示器驱动板一起寄给本公司维修。
3、开机后绿色指示灯起,但显示器不启动:显示器损坏或接触不良。
解决方法:拆下显示器寄给本公司维修。
4、机箱电源总开关打上跳掉:电源火线与零线位置接错或开关损坏。
解决方法:检查电源是否接错和开关是否损坏。
5、温度不稳定,时刻在自整定PID值,有时温度显示为“000”,有时是实际温度:
按说明书中的第“四”条手动设定PID值
6 温度不能升到设定温度,一直相差50℃:
本温控器具有同步升温功能,即当温度升至低于设定温度50℃时,将进行一次自整定,自动算出各自的P、I、D值。检测所有温控点是否可将温度稳定控制在低于设定温度50℃的温度值,此温度值称为整定温度值。射咀快,分流板慢,射咀达到后将等待分流板升温,当都达到且都能稳定控制在整定值后3-5分钟,开始升温至设定温度;正常情况下在此时间内每个温控点都将自动算出各自的P、I、D值,都能稳定控制在此温度值。如果有1个或多个温控点的温度不能稳定控制在整定温度值(过高或过低或上下不停浮动),而且它的P、I、D值都为零,则温控器自诊为有故障,不能正常生产,为了避免烧坏原料,其它温控点的温度将一直保持在整定温度值。
原因及解决方案
①、如果某个温控点在自整定时温度高于整定温度值不下降,出现这种现象的原因有二:一是用二台温控箱控制一套模具所致;二是注塑机料筒射咀温度高而传给热流道所致。此时可将该温控点的设定温度上调,上调值≥超出整定温度值,等升温且稳定后再将温度设定值下调至生产需要的设定值。例如:设定温度为220℃,整定温度值应该是170℃,某个温控点自整定时温度始终保持在182℃,比整定温度高12℃,导致其它温控点的温度一直保持在170℃,不能升至220℃,此时将该温控点的设定温度上调≥12℃(即≥232℃),等升温且稳定后再将设定温度下调至220℃。
②如果某个温控点在自整定时温度低于整定温度值或上下浮动不稳定,则按说明书中的第“四”条手动设定PID值
(二)报警时显示器显示三行英文内容如下:
第一行显示:SYSTE ERROR FOUND(发现系统出错)
第二行显示:显示报警内容
POWER HEATER TRIAC ERR#1:第一段电源缺相或连接线接触不良或加热器损坏或可控硅损坏
FUSE OPEN ERROR #1 :第一段保险丝断开
SENSOR OPEN ERROR #1 :第一段感温线断开
SENSOR REVERSE #1: 第一段感温线接反(开始加热时温度往下降)
OVER TEMP [SET+30℃] #1 :第一段温度超过30℃
CONTROLLER COM. ERROR #1: 第一段温度系统故障。将该段温控表与其它温控表对换后如果报警显示还是第一段温控点,则说明温控表没坏,是连接线路接触不良或热流道漏电。如果对换后报警显示是其它温控段,但还是那块温控表控制,说明那块温控表有故障。
注意:“#1”表示第一段(点),“#2”表示第二段(点),以此类推。
第三行显示:MENU KER:SETUP CHANGE